Two firsts: a Patrones pattern, and sewing with rainwear. I'd tried sewing rubber backed microfiber last year to make a raincoat and it was a disaster. This stuff is a poly woven raincoating from
Gorgeous Fabrics, and it was easy to press and sew. So much so that I'm thinking of making another raincoat, in a traditional trenchcoat style. If I do that, I'll be sure to leave seam allowances on my pattern pieces. It was really hard to keep from pinning outside the seam allowances since there aren't any on the Patrones patterns, and I didn't want to pierce my fabric (kind of defeats the purpose of having waterproof fabric to make holes in it!)
Patrones doesn't have a website, but here is a photo of the design.

I made a muslin, and decided agains the gathered sleeves. The cuff turned out to be tighter than depicted, more like a shirt cuff than a jacket cuff. (I also briefly had it in my head that this could be a second coat if I underlined it, but I think it's a bit loud for my tastes.)

The thing that I
love about this pattern, and that I think I'll love about all the other patterns in the magazine are that I didn't have to make
any alterations at all! Normally, I have to take shoulders in, shorten the bustline, narrow the ease in the upper arm, shorten the sleeve, shorten the waistline, bring up the hem a few inches... but the proportions were perfect straight off the tracing sheet. I was really surprised, and then learned that Patrones Joven is designed with teenagers in mind. Now, don't you all go running out and buy all the Patrones Joven! I get dibs!
That said, I don't think I'd recommend this magazine to absolute beginners unless you are fluent in Spanish and have a lot of patience to ease the curved pattern pieces together. I used
Google Translate to translate the instructions and while the tool was really cool (it was fixing its grammar as I typed!) there definitely was a lot lost in translation. Regarding the ease, I had to really adjust the sleeve cap and carefully clip the neckline and collar pieces to make them fit. That said, I love how the sleeves and shoulders fit me. I am so in love with the sleeves that I now want to make more coats from this issue, and hate all the coats I've made with patterns from other companies.
Because I wasn't crazy about the sleeves, I switched out the sleeves with another coat in the issue for simple straight sleeves. I like the stand-up collar, but will likely wear it open, as in the right photo.

The lining is also from Gorgeous Fabrics.

Here are some detail photos. The magazine would have you do a lot of decorative hand top stitching, but that's not really my bag. I actually wanted the coat to be as minimalist as possible, so did very little topstitching, all close to the edges with the purpose of reinforcing seams or holding the facing in place. I used the machine to bartack the epaulettes, though I suppose I could have hand tacked them for a cleaner look.


And finally, my little secret... I ran out of the buttons that I was using, and so am using a different button on the collar. I've seen this on some of Lee's
Paul Smith jackets, and I figure that if Paul Smith can do this and make it look fresh and fun, I can do the same.


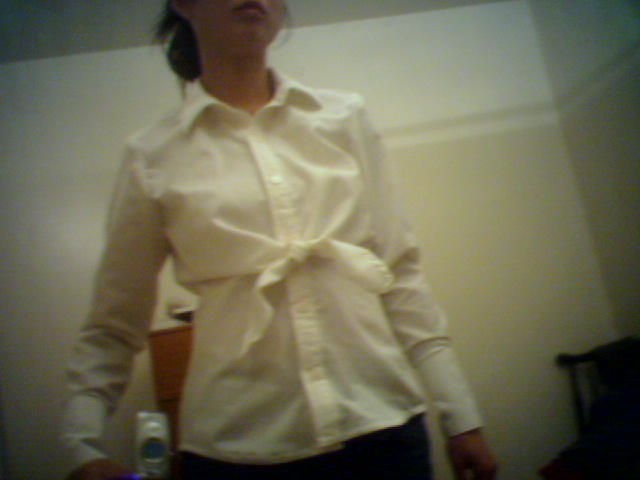 In 2006, that first top disappeared and I replaced it (that's the nice thing about being able to sew) with this toile version that I still wear regularly.
 Two years ago, I experimented with a little color, and there was this.
 I would continue, but you get the idea. This isn't post wasn't meant to turn into a retrospective of my personal style...
 I followed the directions to a T, even though my intuition told me I could make the narrow hems just as well with a narrow zig zag and trimming the fabric. I do like the narrow hems, they really make the vintage inspired look, which you can see on the sleeve tie.
 I probably could have gone a size down, but figured with such light and flowy fabric it would be OK to try this in a size 10 to see how it would fit. I think this will be great in the summer when it's super hot and sticky. It is very loose, and this knot shifts around a bit but I think it wouldn't be a problem if I were more inclined to tuck in my shirt (and make my mother proud!)


