Wednesday, July 21, 2010

A whole lot of shirt.

I'm still trying to decide whether I'm wearing this shirt or it's wearing me.  I'm not exactly channeling Seinfeld's puffy shirt, but I feel like it's pretty close to it.  It's #125 from the May 2010 issue of Burda magazine, made up in a crinkle voile that was an impulse buy at Joann Fabrics last summer.  This shirt has it all.  Ruffled collar, puffy sleeves with ruffles, shirring at the waist  and collar, a drawstring keyhole neckline (which I didn't notice in the magazine anywhere)!  I made a size 38 with my usual adjustments.

It's kind of at an odd length where I think it needs a few more inches to be a dress.  I suppose it could work as a swimsuit coverup, but it's quite a shirt to wear to the beach.


You can't see from these photos that the bottom of the keyhole opening falls to the bottom of my ribcage (it's just as well.)  You also can't see how messy this is on the inside.  There's really no way to make a neat finish with all the shirring and gathering, plus the drawstring casing that you make by folding over part of the neckline.

Here's shot of the inside of the collar.  Looks like a mess, eh?

 I don't know what I was expecting, but I couldn't really get an idea of length or puffiness from the magazine photos.  The model is wise to wear something underneath if she's going to leave the ties open.  It's a really deep neckline if you're going to do that.

Too small to see anything!


Now in hindsight, I guess I shouldn't have been surprised by the keyhole.  You can see it right there!

Despite all my fussing about it, I will admit that it's a very feminine cut and it was fun to sew.  If you are looking for something that has a lot of details, this is your friend.  You have to shir the collar pieces, then gather them to attach them to the front of the shirt.  Next, you have to make a casing for the drawstring, which I think is a little redundant; you could just sew the ties to the collar opening; the casing is only 1" long.  You have to sew the ruffles to the sleeves, then make a casing and insert elastic.  Lots of busy work!

It is one of a kind, and because of the cut really has to be worn with something tight on the bottom to balance it out.  I experimented with a couple pairs of skinny jeans and found that these long boot cut jeans (I always have to wear heels with them) were the best match for the volume and length of the shirt.  I'm sure that there are some taller readers out there who won't have this problem, though!


Monday, July 19, 2010

Simplicity 2593: Cute and easy

It doesn't get much better than this.  I managed to squeeze this shirt out of 1 yard of fabric (the pattern calls for 1 1/2 yards), which was a whopping $2.95 at my local fabric shop.  You can sew this in about an hour.  Possibly with your eyes closed.  The frills on the shoulders really make this top different.  There's no way to make them "perfect".  They change shape and position as you wear them, making this shirt artsy but not in a bad way.

The only thing that I'm not so crazy about is the shoulders, which I think are a little wide on me so that the straps often shift and show my br.a straps.


Oy vey.  Now I see that I have quite the runner's tan -- look at the top of my white X!

And... for those of you following along at home: I got the dye stains out of my blue skirt with Oxyclean.  Amazing stuff!

Sunday, July 11, 2010

A tale of 1 fabric, 2 skirts

This is a story of Fabric Fail.  I bought this cool abstract print from an online retailer who will remain nameless because it's not their fault that this fabric didn't work out for me.  I washed and dried the fabric when I got it, and noticed that the black dye had bled out a little.  Because the print is so abstract, I figured - eh, annoying, but not the end of the world.

See?  The bleeding just looks like shadows and even though I know it's there it's really not that noticeable.  You can see it faintly a little to the right of my hand.

So I figured I would go ahead and sew a summer skirt with it.  This is the skirt I decided on, 111B from the April 2010 issue of Burdastyle.  I wasn't going to be put off by its "tall" designation.  I'm anything but tall, but I decided to trace the smallest size and adjust it.  My usually petite-ing (it's a word now!) is to take up a 1/2" between the waist and hips on Burda patterns, so because this pattern was intended for Amazons, I took it up a full inch between the waist and hips.


 Well.  That worked in theory.  I probably should have also taken a little width out of the back.  Looks good in the front...


It also looks all right from the back, but it it is way unflattering from the side.  I really thought that hanging this skirt in the closet for a few weeks would relax the fabric some, but I think the design was really never meant for someone of dimunitive size.

The second part of this story is where I still try to help this fabric redeem itself.  I used it for the pockets of this skirt, a tried-and-true pattern for me (110 from the September 2006 issue of Burda).  It has princess seams in the front and back, with small pleats at the high waist.  I made this in black pique two years ago and wore it death.  This is a size smaller (36) than my actual size (38), which sometimes works for petite-ing instead for of going through the hassle of adjusting the pattern.  This one is pastel blue, pique again.  I would love this skirt.... maybe you'll agree, looks good from the front:
The back (excuse my inability to dress myself, I must have left the bottom hook undone!):
And the pockets in the pleat front are great:

Speaking of the pockets, they bled onto the front of the skirt after washing! You can see what looks like gray smudges on the front of my skirt.  This makes me so mad, because I thought that all the bleeding was done after the first wash.

The moral of this story is: Don't trust anything that bleeds before being cut.  This fabric will be for muslins only from now on.

Friday, July 9, 2010

Inspired: Vivienne Westwood Anglomania via Vogue 8385

As I've discussed before, one of the nice things about sewing is the ability to replace your favorite garments when they wear out or get lost. Even better is being able to copy things you see, and even better than that is when you get instructions on how to do so. Look at this knockoff of Vivienne Westwood's Anglomania "Atlantis Sunday" top by Kristin at Very Prairie, which she describes in tantalizing detail AND provides her alteration to the peplum to get the same look as the designer version! How fun! How can you not make one of your own?

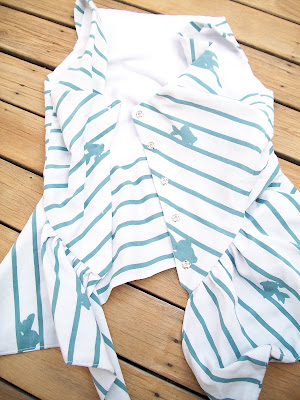
I think that Kristin's version is fun in plaid, but I decided that stripes would be the way for me. Mine is made from silk striped broadcloth from Fashion Fabrics Club, with just enough randomly placed goldfish to add a little whimsy. I made the same peplum alteration that Kristin made, and switched out the 8 buttons for 6 snaps. If you see below, the Anglomania version uses snaps attached with a cross-stitch... I hate making buttonholes, so this worked out pretty well.


The waist falls at my natural waist, and I didn't need to make any alterations in length. I'm also pretty happy with how the stripes matched up at the sides (at least on the left side... sorry, no pics of the right side but you'll have to take my word for it that I got a pretty close match there as well!)

Here are some detail photos: I used white broadcloth for the back lining. I bought the recommended amount of striped fabric for my fabric width but ran out of fabric because of the peplum change. The lining doesn't show at all, even in the front, so you don't have to worry about using fashion fabric for all the pieces... the pattern instructions call for fashion fabric lining but you could get away without as I have.
Now, I'm not trying to show of my b.ra or cle.avage here, but these photos show how the folds works in the front of the top, and how good the coverage is despite being a wide and low cut U-shaped neckline. Overall, I love this top and look forward to an occasion to wear it!