Tuesday, March 13, 2012

Almost perfect shirt

I'm in pursuit of a fitted button down shirt.  I have several shirts I like but they are a bit casual.  I made a comparison in my last post.  This shirt is Burda 10-2009-105, which is fitted with front and back darts and narrow sleeves.  It is also longer than my other dress shirts.  I left the double fold out of the back (I'm sorry I can't think of how better to explain this and can't navigate Burda's website to find a line drawing), shortened the sleeves 1/2 inch, and changed the sleeve vent from men's style vent to an easy bias bound vent.
This is how I wore it to work today.  The fabric is a woven pin, which looks a little hypnotic in these photos.
It tucks in well, I think because it is so long.  I also went a little crazy with Photoshop and did something weird to my neck.

I was really happy with it until I saw this photo.  Lee assures me that shirts do this in the back.

The collar is way too big to wear buttoned up, which is a look I've been into lately.
I am going to make this again, changing out the collar for a smaller one... and then I think I have my perfect shirt!


Saturday, March 10, 2012

Quest for the perfect shirt

Thanks, to everyone who came up with ideas for the hooks and eyes problem in my last post... and to all who commiserated!  I tried extending the fly stitching into the waistband, and that helped a little bit but I think that if I sew hooks and eyes on a pant waistband in the future I should redraft it to allow for an inside button.

After the big coat project, I decided to sew something easier and more straight forward.  Do you also alternate your sewing?  I like to do a few easy things after sewing something hard (or something that just didn't work out), and a tailored shirt is one of my favorite things.  I just finished Burda 10-2009-105, which is similar to my favorite shirt (I made it again this winter in white stretch poplin) and I think I may have a contender for a perfect shirt.  Here's a comparison of 10-2009-105 (new shirt) and 09-2009-105 (favorite shirt):

10-2009-105 (new shirt)
  • sleeves are more fitted
  • body is fitted with darts
  • collar is big and 70s-ish, not to my taste
  • hem is super curved, but this isn't an issue
09-2009-105 (favorite shirt)
  • fit is fairly casual but in a light fabric it doesn't matter
  • collar is small and flattering

I think the natural solution is to substitute the collar from one to the other for the perfect shirt.

Here's a photo of the new shirt, and I will try to take a photo of me wearing it to post soon.  It's made from a men's shirting I bought from Gorgeous Fabrics (I think it's all gone, sorry!) and I sewed the buttonholes in a contrast thread.  I got the idea for that from Lee's Paul Smith shirts -- very sharp but still fun.  

Burda 10-2009-105 collar and cuff
Those buttonholes took forever to make because my machine kept choking up on them.  So I decided it was about time that I took my Singer sewing machine and Juki to a suburban repair shop to get fixed.  The Singer broke 3 years ago and I couldn't afford to fix it on my measly post doc salary... I bought my Janome for less than it would have cost to fix the Singer!  I figure now that I am a grownup with a grownup job, it's time to get my Singer fixed.  I am looking forward to having a more powerful machine and being able to use my buttonhole attachment to make fancy buttonholes again.  I actually don't miss serging so much, but it would be nice to have that working again as well.

I am thinking of my next project and have no fewer than 4 things on my mind to sew.  I am thinking of sewing another Vogue 1283 dress but in a size smaller to be more fitted, and I just bought striped wool jersey to either make a boatneck top like Jenny's, or the Burda twist top (Alison reminded me how good this looks in her recent blog entry), a suit jacket, or a fuchsia pair of skinnies.

Phew!

How to decide?  I guess I should pick something and start cutting.  

Monday, March 5, 2012

High waisted wool trousers

These are Burda 08-2009-105, which I made at the beginning of winter and haven't had a chance to photo until now.  I love how cozy these pants are (heavy herringbone wool, lined to the knees in Ambiance), and the cut is so flattering and office appropriate.  The thing that bothers me, though, after a winter of wear, the hooks and eyes are becoming visible at the front.  I haven't gained any weight around the middle, I interfaced the fabric, and i don't know why this has happened.

Is there some trick to sewing hooks and eyes that I forgot?
Front, 08-2009-105 trouser.  You can see the hooks and eyes pulling here.


Side.


Back.

Sunday, February 26, 2012

Early spring coat, courtesy of Patrones Joven

I love Patrones coat patterns for several reasons, but I think the biggest reason is the sleeves.  Not only are the designs super cute, but they fit so well if you are twiggy of the arm like me.  I didn't bother with a muslin for this coat because my first Patrones coat fit so well.  This one is from the same issue, design 28.  Mine is made in a Vera Wang teal and navy tweed that I bought from Fabric.com last year, interfaced with silk organza (never again, that was way too much work), and lined with gold flannel-backed satin.  It's cozy and just the right weight for early spring in New England, when you still need a heavy coat but don't need your 700 down fill wind and rain resistent coat.  It's still cold but not Arctic cold at this time of year.   
Patrones 285, No. 28
I think it should have been the same length as my raincoat, but because I used really bulky fabric (think afghan throw) the turn of cloth shrunk the coat quite a bit.  You can see the difference between the pattern piece and front in this photo.
I lost about an inch in the bodice piece, which then affected the overall fit.
Now, on to the coat.  I did all the hand sewing for the interfacing during the week.  I've been under the weather and I guess the upside of being at home and spacing out in front of the TV is that you can do that while mindlessly basting interfacing to fabric.  On the downside, I am going to be really behind when I get back to the office this week.
At the end of a chilly Sunday morning walk.
You can kind of see the curved front when the coat is closed.  Also, let it be known that I am unable to pose for a photo without making some kind of goofy face.
The turn of cloth (I'm blaming the coat's shortcomings on the super thick fabric) shortened the bodice and I don't think you can see it from the front, but definitely from the side.  I would make this coat again in a lighter coating so that the bodice makes it over my bust.  As it is, the skirt drapes from almost the fullest point, making the coat a little tent like.  
If I stand with bad posture the tentiness isn't so pronounced.  I'm also showing off one of my single welt pockets.
Here it is from the back.  It fits very well in the shoulders.
Now that you've seen my new coat from all sides, can you spot my cutting mistake?  (Hint: look at the front skirt.)  I cut the front skirt on the cross grain.  I didn't notice until I put the coat on after finishing it and thought that the plaids didn't match up quite as well as I thought they would (they match very well in the bodice, which is princess seamed, if I say so myself.)


Photo showing lining and facing.  I'm grateful for my steam iron that tamed everything and put it in its place.

The fabric was challenging to work with.  It was so thick that I had to pull it through my sewing machine at some points.  It also had to be interfaced.  Being so loosely woven (it really is not unlike a granny square afghan throw in that respect), I didn't want to go through the effort of sewing a coat for it to just become a shapeless heap after one season.  Because I basted organza to it, the basting stitches would get stuck in the feed dogs of my machine, further confounding the situation.  Because I refuse to hand stitch unless absolutely necessary, bagging the lining was criminally frustrating.  Luckily I have a steam iron that will beat the fluffiest fabric into submission because otherwise the fabric would have won and I would be posting picture of a shapeless pouf.

Despite the problems posed by the fabric (and ultimately, less than satisfying fit) I'm pretty happy with this coat.  The look is very retro, and it's cozy without being too casual.  And hopefully, nobody will know about the cutting mistake.  Except for you.


Saturday, February 25, 2012

Single welt pocket notes

I just finished a marathon coat sewing session.  I'm particularly happy with having figured out how to make a single welt pocket.  There are a million ways to do anything, and this is how I did mine.  I took photos of the first one I did so that I could remember for the second one.  This isn't a tutorial per se, if you know the basics of a double welt pocket, I think you can follow along... but the following may only be useful to me.  If you're here because you want to learn how to make a welt pocket, here is a great tutorial on making double welt pockets from Gorgeous Things.

I wasn't thinking and didn't use fusible weft on the pockets.  As it turned out, organza underlining works just fine.  The pocket placement is marked in chalk.
I basted a scrap of organza to the front.  
Stitch on the marking on the other side.  You can see I wasn't quite sure where the markings were, but that's OK so long as I cut to the right stitching line in the next step.  I used a short stitch in the corners.
Cut through all layers, making cuts to the corners.
Flip your piece over and pull the organza scrap through.  Press it.  You want to make as perfect a window as possible.
Believe it or not, I know it's hard to see, I am pinning the raw edge of the welt to the bottom raw edge of the opening.   Stitch as close to the corners as possible, because this will help you keep a nice rectangle shape.
Stitch the triangles on the end to the welt, trying to keep the rectangle shape as much as possible
If all goes well and you didn't stitch past the top edge of the welt when stitching the triangle, you should have a welt that fills your rectangle window.  I'm checking here to make sure I didn't overstitch.  This is a good time to press that puppy again to make sure everything is in place.
If you've been doing everything right, you've stitched the welt to the bottom and side of the rectangle.  Pin a pocket piece to the top part of the rectangle and stitch, making sure you stitch all the way to the clipped corners.

This is an action shot, of what, I'm not sure.
I hate hand stitching, but I ended up hand stitching the other pocket piece to the welt.
Stitch the pocket seam.

Press it.  You can see I stitched the pocket to the welt again at the top, that's where that mess of thread is because my tension was off.  Stitching the pocket to the welt will keep it from flopping around inside your coat.  Floppy pockets = sad pockets.
Ta dah!  Here's how it looks on the outside.


Tuesday, February 21, 2012

Vogue 1283, the perfect dress

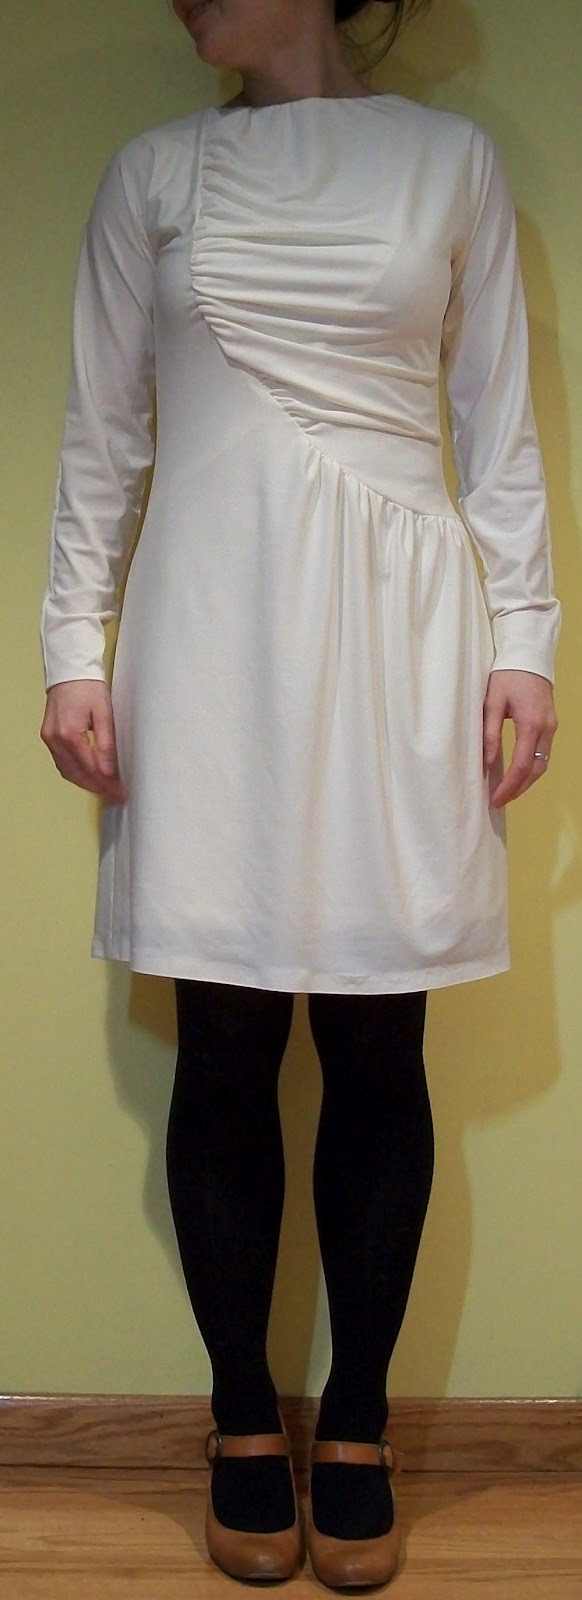
I saw this dress in Vogue Pattern's spring 2012 lineup and new I had to have it.  I made a muslin according to my measurements, meaning I needed a 10 (there were no measurements on the pattern), and (I've learned) it worked out perfectly.  Here's the final version, in winter white 4-way stretch jersey from Fabric.com's Vera Wang sale last year. 


I wore it with a sweater today.  It is still winter, after all.
I love this design.  I like S-shaped detailed in dresses, and have Vintage Vogue 2787, which I've never gotten around to making because it just didn't seem very wearable to me.  Cut to Vogue 1283, by Tom and Linda Platt, which continues the S-shape to the back and is like a more current version of the vintage design.
Vogue 2787, great in the front, but with coffin back.


I'm not done gushing.  I love the fit.  It skims the body and flatters.  I'm a little disappointed that the arms aren't more form fitting but I've already known that I have twiggy arms.  After seeing annie11's Pattern Review, I considered cutting a size 12 and am glad I didn't.  Like annie11, I didn't need to insert  a zipper at the neck.  I think I might regret having used 4-way stretch jersey, because in my experience it stretches out of shape, but I have already ordered fabric for the next iteration of this dress.  

Some nitty details: the dress is short.  I usually raise a hemline by 2 inches, but only raised this hem by 1 inch.  I used stitch witchery on the sleeve and skirt hems, and was a little disappointed by the fabric bubbling in a few spots.  I think my fabric is a little too light weight for stitch witchery to work its magic.  The dress is comfortable and easy to wear with the self lining, even if you put the lining in backwards (whoops, but I don't think the neckline differs from the front to back.)  I used clear elastic on the seams and neckline instead of stay tape and I think it gathered the neckline in a little bit, but I'm not bothered by it.  Overall, I'm thrilled with this design and plan to make another.  I could see how you could make it in two colors, and think it would look great... but it's a little too adventurous for me.

Wednesday, October 26, 2011

Inspired by Vivienne Westwood: Burda 08-2010-107

I love this skirt and want to wear it all the time.  It's everything that I love about sewing: instant gratification due to quick construction and good fit.  This skirt takes 2.5 hours to complete, from laying out the pattern to finishing the hem.  It has an elastic waistband, and I left the pockets out.  The decision to leave the pockets off wasn't so much a design decision as it was a wearing decision.  I've found that side seam pockets on skirts tend to gape open and I've been sewing them shut on other skirts.  I figured I would save the time of having to do that in the future.

The skirt is tapered and has a large overlap in the front.  When I saw the design in the magazine I was a bit unsure that this would be wearable because of the huge overlap -- I was sure it would turn into a shapeless mess.  My muslin proved me wrong and I went ahead with my Shetland wool from Fabricmart.

I shortened the skirt by 1" and think the length is still office suitable without being dowdy.  I want to wear this skirt every day!


Almost matched plaids.
Better matched plaids.


I cut the back on the bias, to try to match plaids and to avoid the coffin look.

Here is the inspiration in bright red tartan, the Vivienne West Cosmopolitana skirt.  As you can see, the back has deep pleats, but I didn't try to replicate them.

And there are pockets, as you can see in the photo on the left.  Below is the line drawing, which you can see is a pretty close approximation.
Burda 08-2010-107 line drawing